

The Helicopter Vapor-Cycle Air Conditioning System
Although it would not be uncommon to see air conditioning in VIP helicopters, the vapor-cycle cooling system is more common than people might think. Once thought to be a luxury item, systems are becoming mission essential due to shifting attitudes about cabin comfort linked to air crew performance, and the recent legislative push to require air conditioners for Helicopter Emergency Medical Services (HEMS) operators.
The effect of aircraft cabin temperature and ventilation on crew performance has long been a subject of aeromedical study by flight physiologists and physicians alike. The bottom line is that if helicopters do not have air conditioning, air crews should be fully aware of the possibility that heat stress can affect mission readiness and efficiency. Therefore, it should not come as a surprise that the major helicopter OEMs offer the availability of air conditioning in most of their models. This has also stepped-up the need for expert maintenance practices and for HEMS operators, making the difference between flight readiness and AOG.
In this article we will try to unlock some of the mysteries of helicopter air conditioning systems to understand how they work and what it takes to keep them operating. We’ll explore some of the misconceptions of how they cool and what the limits are in extreme temperature and humidity conditions. Lastly, we’ll cover general servicing and troubleshooting tips.

The Fundamentals
Air conditioning systems for helicopters have been around for a long time. Some systems in fact still operate with the old CFC-12 (R12) refrigerant, while the newer vapor-cycle systems are serviced with the more environmentally friendly HFC-134a (R134a). This section contains a general overview of a typical vapor-cycle air conditioning system and how it functions.
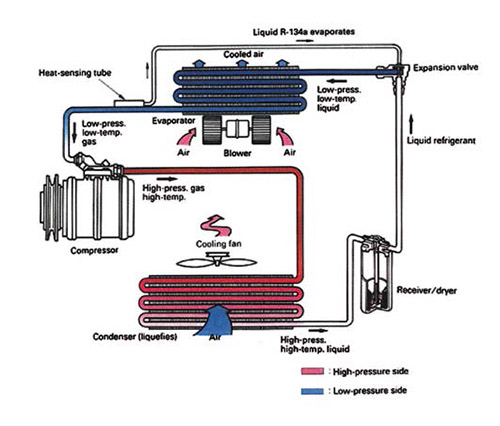
This type of system operates in a closed loop, in which the refrigerant absorbs heat from the cabin and rejects it into the outside air. The refrigerant then returns to the cabin to repeat the cycle. The operation of the system is described below and involves these major components: compressor, condenser, receiver-dryer, and evaporator. (See Figure 1 on page 8.)
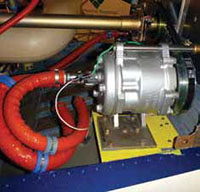
The compressor (consider it the heart of the system), receives through the suction port, low pressure heat laden refrigerant vapor from the evaporator. The compressor pressurizes the refrigerant depending on system demand. This increases the temperature of the refrigerant. At this temperature and pressure the refrigerant is above its boiling point. The compressor then discharges, out the discharge port, superheated refrigerant vapor to the condenser.
The refrigerant flows into the condenser. The condenser has numerous cooling fins in which the vapor is pumped. In the condenser the high pressure vapor condenses into a high pressure liquid. This is achieved by using a fan to force air over the surface of the condenser enabling heat to transfer from the refrigerant to the outside air thus reducing its temperature. Ideally, only refrigerant in the form of a high pressure liquid leaves the condenser outlet.
The high pressure liquid refrigerant flows into the receiver-dryer which stores, dries and filters the liquid refrigerant. The liquid refrigerant then flows from the receiver-dryer to the expansion valves. The expansion valves change the refrigerant into low pressure, low temperature liquid/vapor by lowering the pressure using a variable orifice. The orifice has high pressure on one side (from the receiver-dryer), and low pressure on the other side (evaporator and compressor), and allows a small quantity of refrigerant to flow through it. The sudden drop in pressure and temperature causes some of the refrigerant to vaporize. The low pressure low temperature liquid/vapor then flows to the evaporator where the heat is transferred from its surface to the refrigerant through vaporization. The heat comes from inside the cabin and is blown over the evaporator’s surface. Once the refrigerant has completely vaporized and reached its saturation point it should still be able to carry more heat. The refrigerant continues to flow through the remainder of the evaporator coils absorbing more heat and becoming slightly superheated. Thus, air is blown through the evaporator, has its heat extracted/transferred to the refrigerant, resulting in cooled air being ducted into the cockpit and cabin through strategically placed air outlets.
The low pressure low temperature slightly superheated vapor refrigerant flows to the compressor and the cycle repeats itself.
Some systems incorporate a refrigerant bypass system to eliminate compressor clutch cycling. The bypass improves temperature control and extends compressor and belt life significantly.
How does it work? Design features may vary but, generally, the bypass system senses evaporator temperature. When it reaches the point designated by the cockpit temperature control knob, the bypass valve opens and refrigerant bypasses the evaporators and is returned to the compressor to repeat the cycle. This occurs until the evaporator coil temperature rises above the set-point. The bypass valve closes and the refrigerant completes its cycle through the cockpit and cabin evaporators.
Effective Cooling
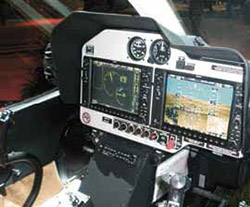
Now to clear up a common misconception regarding how the air conditioning system cools a helicopter, we will explore the concept of “effective cooling.” Mechanics may hear an owner/operator’s complaint go something like this, “I want that air conditioning to blow ice cubes and cool the helicopter like my dad’s Buick!” It just doesn’t work that way. Design is a major factor in solving the challenges of cooling a non-pressurized aircraft flying at low altitude, where large amounts of glass providing great visibility create a “flying greenhouse” effect. Designers must address the difficulty of creating a uniformly cool ambient temperature in the helicopter, and thus the importance of providing huge quantities of cold air directly to the head and torsos of the crew members and passengers. Sufficient air flow from appropriately sized evaporators, blowers, cleanly-designed ducts, and large outlets, are critical to ensuring passenger comfort. All the British Thermal Units per Hour (BTUh) in the world means nothing, if the passenger does not have sufficient air flow. Basically, it is not the same as cooling your dad’s Buick or any automobile for that matter. For helicopters, placing evaporators near strategically placed air outlets helps ensure cool air flows with sufficient volume and velocity to keep everyone in front of an air outlet comfortable. The cockpit is especially challenging with its large windscreens and avionics adding even more to cockpit heat signatures. Thus, effective cooling is influenced by evaporator size, quantity and location, making air conditioners a study in trade-offs since weight and real estate in helicopters can be limiting factors.
For the HEMS community, effective cooling becomes critical. According to Life Flight pilot Jerry Jones, the average emergency flight is typically 25 to 30 minutes and extremely hot conditions can cause dangers to patients.
The Nuts and Bolts
 Clearly, maintaining air conditioning systems at their optimum can become mission essential. Many HEMS operators will ground their helicopters if the air conditioning is inoperative. Now, let’s discuss maintenance, servicing, and troubleshooting tips. Since many systems differ in design and features, the discussion will be limited to typical systems and operating conditions.
Maintenance
The keys to an air conditioner operating at optimum performance involve the following factors:
• Proper refrigerant and oil charge
• A sealed system with no leaks, free of moisture and contamination
• Evaporator and condenser coils free of debris obstructing air flow
• Evaporator and condenser blowers working properly.
Refer to the specific system Instructions for Continued Airworthiness (ICA) or maintenance manual for additional information regarding periodic inspection criteria. Here is a typical checklist to ensure trouble-free operation:
• Check the compressor for security of hardware and signs of oil or refrigerant leaks.
• Check compressor drive belt (if applicable) for proper installation, condition and tension. Replace the belt if it shows signs of excessive wear (glazing, cracks, or exposed fibers).
• Replacement of the receiver-drier bottle is a good idea if:
- Any air conditioner component has been replaced
- The system refrigerant has been evacuated
- Any of the refrigerant plumbing lines have been disconnected
- The system has been flushed
- If in doubt, replace it.
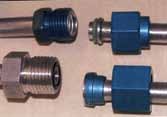
• Check system plumbing lines and hoses for security, condition and signs of leaks.
• Do an air conditioner performance test. Be aware that comfort is provided by “effective cooling.” That is, cold air is directed, via strategically placed outlets, to the head and torso areas of passengers and crew rather than trying to create a uniformly cool ambient temperature in the helicopter. Outlet temperature readings should be taken by inserting a mechanical temperature probe into the air outlet. Laser temperature sensing devices do not work for this application. Depending on the inside and outside air temperature and humidity conditions, performance should be compared to the criteria given in the appropriate ICA or maintenance manual.
• If the air conditioner is not cooling effectively, the most common cause is the level of refrigerant charge or leaks in the system. Recovering the refrigerant, evacuating the system, leak detection and recharging the system with the specified amount is the most effective way to ensure proper charging. If a leak is detected, locating and repairing the leak will be necessary before recharging the system.
Servicing
The most common problem with poor performance is refrigerant charge. Too little or too much refrigerant can significantly degrade performance. Contrary to popular belief, more is not better in this case. Additionally, the practice of “topping off” a system with refrigerant is dicey at best, especially if you have a leak in the system. Checking the site glass for bubbles does not work for R134a refrigerant systems. Achieving the optimum level of refrigerant charge can be tricky, but following these simple steps can make things easier. It is best to use a refrigerant charging station since it is capable of automatic refrigerant recovery, recycle, evacuation and recharging. Again, refer to the specific system ICA or maintenance manual and local shop servicing protocol for additional information regarding the safe handling and use of refrigerant and certification requirements.
• Check the system for leaks using an electronic leak detector. Since refrigerant is heavier than air, leaks are most likely to be detected on the underside of hoses and fittings. All leaks must be repaired before servicing the system.
• Charge the system with the specified amount of refrigerant using the ICA or maintenance manual as a guide.
• Test-run the system after servicing to confirm the system is working properly.
Lubricant
Let’s turn to refrigerant oil for our next discussion. During normal operation, air conditioning oil is suspended in the refrigerant and lubricates the moving parts and seals of the system. When the system is turned off and at rest, the oil returns to liquid form and is evenly distributed across the system. Refer to the ICA or maintenance manual to ensure the correct oil type and viscosity is placed in the system being serviced. The best way to know how much oil is in the system is to keep track of any oil that is added or removed. For example, when reclaiming refrigerant, be sure to note any oil that is removed from the system, and replace the lost oil before or during re-servicing. Keeping a “running tally” of the oil in the system will ensure you have the optimal charge at all times. The air conditioner ICA or service manual lists the proper refrigerant oil charge for the system.
What are the indications when something has gone wrong with the oil charge? An air conditioner with too much oil may not suspend all of the liquid oil in the refrigerant and can result in compressor “slugging.” This is normally indicated by compressor lockup and broken air conditioning drive belts. Too little oil will not allow the refrigerant oil to properly lubricate the compressor and expansion valves. This results in seized compressors and also leads to drive belt breakage. If you suspect your system is suffering from either condition, a system purge or flushing is usually required to bring the air conditioner back into service. This process, though labor intensive, will remove all oil and contaminants from the system and allow you to add the proper refrigerant and oil charge to your air conditioner. Keep in mind that oil should only be added to the discharge side of the compressor.
Troubleshooting
Remember the owner/operator who complained because his air conditioner wasn’t blowing ice cubes? Well, now that you’ve educated him on how effective cooling works, he may have a legitimate complaint if he comes back and says his system is blowing hot air instead. Finding out why the system is not working is not rocket science but it does require some basic knowledge and troubleshooting techniques.
Assuming that the evaporator and condenser blowers are working fine, here are some basic steps to follow in determining the problem:
• Check that the system has the proper level of refrigerant charge in the system
• Check for refrigerant leaks in the tubes and hoses and the major components using an electronic leak detector (sniffer)
• Check for compressor operation
• Connect a manifold gauge set to aid in diagnostics.
Basically, the most common problem is incorrect refrigerant charge. Here are some other common causes:
• Incorrect refrigerant/oil charge
• Leaks in the system (most common source is the compressor seal)
• Moisture, air and/or contaminates in the system
• Faulty components (clogged expansion valves, blowers inop, leaky tubes, hoses, compressor or heat exchangers)
• Electrical problems (relays, switches, wiring, or simply turning the temp control knob to full cold; don’t laugh, it happens.)
Troubleshooting air conditioning can be frustrating if not approached logically. Start with the most common causes (refrigerant charge/leaks) and work your way down the list. Finally, if all else fails, contact the manufacturer’s customer support group for additional advice.
Conclusion
The keys to maintaining a customer’s air conditioning is knowledge of the system, appropriate tools and supplies (servicing cart, electronic leak detector, refrigerant, and oil), and a little bit of luck. Seriously, luck has nothing to do with it. Some mechanics tend to shy away from fixing air conditioning problems. Hopefully this article has taken some of the mystery out of maintaining, servicing, and troubleshooting the more common problems associated with helicopter air conditioning systems.
 Ray Loupenay is the Customer Service/Sales Manager at Air Comm Corporation in Boulder, Colorado. He has been in aviation for 29 years and holds B.S. in a Professional Aeronautics. Air Comm is a leading provider of environmental control and thermal management systems for a wide range of aerospace applications, including fixed-wing and rotorcraft platforms.